Scheduling New appointment
There are two ways an appointment can be scheduled depending on Patient status.
Search for the patient by first name, last name, or phone number, and then use the quick action icon against the Patient’s Name to schedule an appointment with the desired patient. (In case of an Established Patient)
Proceed to the following three screens by hitting the Schedule Appointment in Quick Actions on the Flow Board.
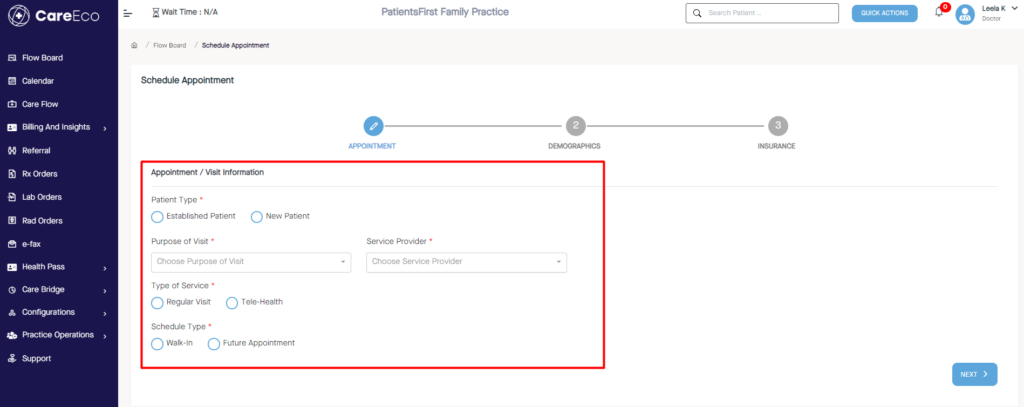
*Schedule Appointment screen presents the information needed to be filled in for the appointment.
- Schedule Appointment – Allows scheduling a new appointment.
- Established Patient – A Patient, who has an existing medical Record with the Practice/ Who received medical care earlier.
- New Patient – Details are yet to be registered in the Facility.
- Purpose of Visit – Reason for which the Patient wants to see the Doctor.
- Service Provider – Doctor who provides care.
- Regular Visit – In-person visit to the Facility.
- Tele-Health – Virtual meeting between the Provider and the Patient.
- Walk-In -A direct Appointment that falls into the queue as per the available slot.
- Future Appointment – An appointment scheduled for a future date/time.
*DEMOGRAPHICS screen shows sections that must be filled up with the patient’s data, as described below.
1. Patient Demographics – Basic details of the Patient.
2. Emergency Contact Details – Contacts that the Facility could reach out to In a Patient’s Emergency condition. Up to five Emergency contacts can be added.
3. Preferred Pharmacy – Nearby Pharmacy address which the Patient has chosen to pick up medicines
4. Consent for Digital Notification – This check box enables the Patient to choose digital delivery.

INSURANCE screen contains the details of the Patient’s chosen coverage type like Insurance /Self-pay/Health Pass.
1. Presents detailed Insurance information.
One can add multiple Insurances.
2. Details about the Subscriber availing of the Insurance need to be filled in.
3. Information about the subscriber’s employer, including the billing address, must be entered.
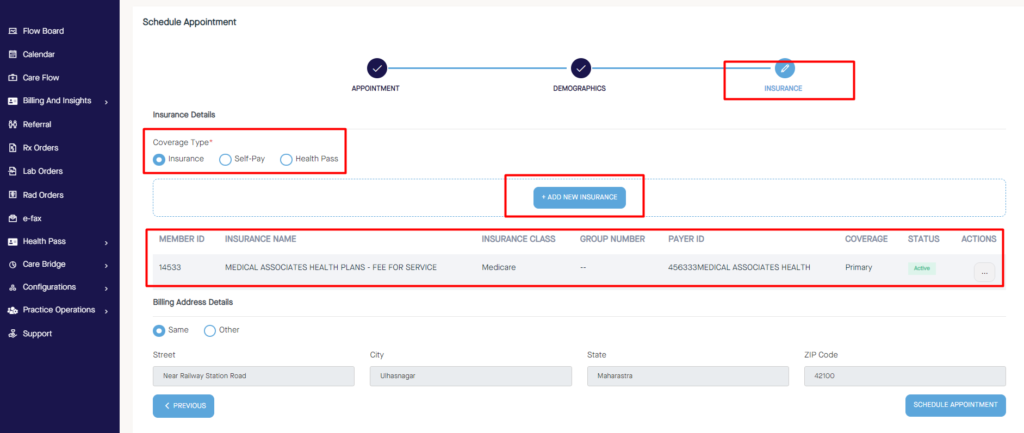
Once details are entered and saved, a pop-up appears stating, “Appointment has been created successfully.”
*Note: Ensure all mandatory fields are filled in.
The following locations allow the user to create an appointment:
- Schedule Appointment Icon in Flow Board.
- Universal Search Field – Schedule Appointment Icon against the Patient Name
- Calendar – (Click on any future slot after selecting Provider)
- Chart – New Appointment (placed in Universal Actions Icon on the Right)
Onboarding Events:
After an In-queue appointment is created, it has to undergo four main events:
1. Eligibility
2. Check-in
3.Doctor Consultation(Room Allocation)
4. Check-out
*Different Appointment related Statuses based on the Events:
1. Every In- queue appointment status is marked as – Walk-in when the Patient walks into the Facility.
2. The status changes to Nurse Greet, where the Patient waits for his turn.
3. The status is changed to Consultation when the nurse allocates the room to the Patient.
4. The Status is marked as Completed after the Patient Check-Out happens.
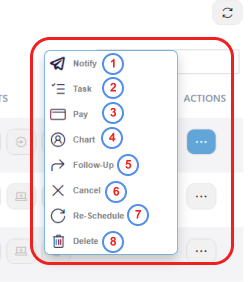
Appointment level – Actions

- Notify – Enables any communication to the Patient through Front Office via phone call or SMS. (Ex: Rad/Lab results/Rx Refills/Claims/Payments)
- Tasks – Tasks are activities. Ex: Referral, Chart Signoff. It enables the User to Assign / Respond to a particular task.
- Pay – Enables the User to pay for the current Appointment/ Past Appointment if any balance exists.
- Once the appointment is fulfilled, the User can view the entire details related to that appointment in Chart.
- An Appointment can be Rescheduled, Canceled, or Deleted.
- A follow-up appointment can also be created if the Provider feels the need.
- The Provider/Nurse needs to enter a reason for a Follow-Up Appointment or to Cancel the Appointment.
- If The User Deletes an Appointment, the Patient will not be notified.